Monday, March 26, 2012

The Left (and Right) Staircase

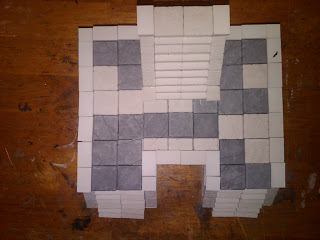
Now that I've got my bricks with the magnets made, it's time to build the staircases. everything in this post, I also did for the right staircase, I just mirrored it.

The first layer here shows the basic shape. The first picture, I marked the spots with an "X" and I will not glue the second layer there. This is for attachment pieces, more on that later.

This second picture is the bottom of it. The arrows show the location and direction of the magnets.

   Next is the second level. Again the "X" and dots are  where I won't glue.

Next, I added the third level, not gluing in the marked areas. Then the decorative pieces, floor tiles,  and railing.


The reason I didn't glue these parts is because in the multiple configurations I intend to use with this, the railings were all different, so instead of building multiple stairs this allows for the the same piece used for different setups. Here's a picture of the 3 different railing parts.
From them picture above I inserted the the back piece and added the wall piece for the other side and you get the next set of pictures.


With that pieces assembled, The top staircase piece can now sit on top of it.


Again, I also built the right staircase the same way just a mirrored version of the left, also with attachments. Below are the parts assembled with a different couple of configurations.

NOTE: Since both of the staircases have magnets in them, I had to make sure they didn't repel each other.

 First hers's a cofiguration without the stairs.


And here's another option with the top stairs added.


Next, the final piece to build.

Magnets

As a I designed this I saw that I would have a piece that was only a half inch wide and would sit flush up against the staircase in one of the configurations. A nice shake of the table or bump on the piece could knock it over and chip or break it. So I thought about magnets. The first thing I got was the roll tape magnet. That didn't work at all, not enough magnetism in them to make it stick. Eventually I found these near rare earth magnets on Amazon the were 1/4" inch cubes. The picture below is for reference.

As you can see below, these cubes fit neatly in standards bricks and 1/2" bricks though I didn't need any of those.
   In the casting process, after you let the mold sit for the time to let it set and then scrape, you can easily push the magnet into the brick mold.

   
NOTE: after pushing it into the mold, you'll need to scrape it again. Make sure you use a plastic scrapper, otherwise your metal one will suck the magnet righ out of the plaster.

   Since these are near rare earth magnets, their ability to repel each other is just as strong as their attraction. So when making these bricks you need to plan ahead with what bricks go where and make sure the repelling doesn't occur. For this project I had to make 8 of these bricks for the left staircase.

 Here's a picture to show where I embedded the magnets for the left side of the staircase.


   The magnets worked perfectly. They are so strong that when the wall piece doesn't move even when picking up the entire stair.

Saturday, February 25, 2012

Grand Staircase - Central Staircase

I've built the central staircase first. The reason is that this is the piece that will be used in multiple configurations. Therfore I'll use it to to make sure that it is working with the other pieces the way I expect it to.

Something I haven't mention is that I haven't attached the railings to the any of the pieces. I plan to do that once I have them all built.


Sunday, February 19, 2012

Grand Staircase - Work in Progress (WIP)

 A couple of years ago I got my hands on a couple pieces of styrofoam that screamed at me "Tower Keep"! This was before I got into the brick building I am doing now.  So a few months ago I decided I should finish making that stryrofoam in to the tower, I thought to myself, I can build a staircase and put a door on it, you know, make it cooler than just painting it grey and being done with it.

So as I started making the stairs, it quickly grew into something much larger than what the tower called for and decided that the tower was going to be just the beginning of the keep. As I fiddled around with the design of the staircase I realized that I could make it modular, we could use different configurations of different pieces.

As part of that modularity I found 1/4'' cubed magnets and have cast them into certain brick molds in order to have the various pieces stay together without fear of them falling over and breaking. More on that as I progress.

So here's the first picture of the vision of the Grand Staircase in it's entirety and unglued.
 Looking at the picture below, you can see the division of the major pieces. Broken into 3 large components; left stair, right stair, and central floor. The idea is that we can remove the top stairs and and use just the left stair and top stair, or put the left and right stairs together and set the top stair on that. There will obviously be a few other pieces to make to give it a complete look and you will see this as I build it up.


Away we go!


Monday, February 13, 2012

   It's been awhile since I've posted. I have been building and casting but the things I've been working on are all predesigned constructs from Hirst Arts. I mostly did o to hone my skill and learn the ins and outs of casting and building. They were fun to build but far from anything great. I've built a Bridge (complete with Cthullhu statues), a Gallows/Guillotene, and a Teleport circle or Stargate, whatever you want to call it. Pictures below.

   Now I'm starting on a couple of original projects and plan to post as I design and build. The first is a grand staircase that is modular. This came from the desire to finish another project that this will ultimately be part of but can be used for other purposes in gaming.

   The second is an ultimate DM screen for gaming. It'll be similar to the one WotC offered a few years ago but bigger. It'll take som time and a lot more casting to finish but ultimately worth it.

Here are a few pictures from the previously mentioned projects.

This is what I call the Bridge of Madness. The statues on them are Cthullhu markers from a Call of Cthullhu game by Fantasy Flight Games and were a perfect size for this.
 Here's the approach.
The Teleport circle we call the Onyx Gate. This picture is not a completed picture. The final has some acane symbols scrolled around the gate.


The last is the Gallows platform.I've also bought a blackhooded excutioner from Reaper Miniatures that I'll eventually paint to go with it.


The other I haven't mentioned it the corner tower piece from the modular wall project I mentioned awhile back. Haven't gotten pictures of it. I'll post those later. As part of that project, I have started designing the gatehouse for it.


Monday, June 6, 2011

Another Brick In The Wall

Been a bit since I've posted bu I've been casting molds and trying to build. I will emphasize trying. Started building the octagonal tower and was not happy with it, So I'm starting over with that. I've built the Wizards Tower and its OK.

I need to get better with laying bricks and be consistant about it. So I thought what is the easiest thing to do? Build a wall section. It turned out fine. But what I'm going to do is build wall sections, corners, and corners with towers. These are things that we can readily use in our gaming.

Here's the first wall section. I wasn't sure how I was going to build the top part up. All I knew I was going to do was make it a 50ft tall wall, which meant 5 inches tall. Once I figured out how I was going to to the wall off  and added the extra crenelations I added anothe inch to inch to it. The next time I do tis I'll build the wall up to 4.5 inches and add the extra inch of crenelations then and it'll be at the height I want.

Here's the front view.

Here's a side view

Sunday, May 8, 2011

Multi-Tasking Building

   As I'm building both the Wizards Tower and Octagon Tower I am finding efficient to do them at the same time. I lay one layer down on the Wizards Tower then switch to the Octagon Tower and lay down one layer of bricks on it. The time between each is good enough for the glue to dry on the previous.

   I am also gonna need to get my hands on some more sand paper. The arrow slits seem to be slightly larger (about 1/8th inch) taller than the bricks once they level out. I didn't expect the bricks to be perfect, as from what I read, to get these molds a precise as these is a lot of work.

Oh, and Thor rocked!!